
This is the most fun art project–and I dare say–the quickest one I’ve ever seen in the Fine Arts painting curriculum! I’m excited to do this with my class, week 17, for Classical Conversations.

Ballet Rehearsal by Edgar Degas, found at: http://www.edgar-degas.org/
The Project:
The book Discovering Great Artists: Hands-on Art for Children in the Style of Great Masters by MaryAnn F. Kohl and Mary Solga suggests painting fish. While that is a very good idea, for the sake of the girls in my class who love ballet, I didn’t want to miss the opportunity to try Edgar Degas’ quintessential subject: the dancer! In class, I will show my example of the dancer, but give students options. For my class of 9-11 year olds, I will bring in books with Degas’ dancers as well as books with tropical fish photos.
Supplies:
cotton fabric (muslin is a good choice) cut for each student
milk (dairy milk, of course, but as we don’t have dairy milk in our house. I used oat milk that we tried but did not like. (It worked as intended, just fine.)
chalk
iron
surface for ironing
Step 1: Put milk in bowl, and place fabric in the milk. Once it is saturated, wring out the cloth. (Note, wringing out cloth makes it wrinkly. You could perhaps find a very careful way to squeeze out the milk without wrinkles–or you could do what I am going to do: sell it to the kids as a great, natural opportunity for texture.)
Step 2: Place it on a newspaper covered area for each student. Give students chalk.
*Note about my chalk: we had the most deceptive box of chalk ever. It showed 10-12 colors across the box front–ranging from white through many pastel colors, including a nice flesh color. But inside the box there were really 6 colors: all flourescent. No white, no flesh color. SO my vision of this project–to focus on the Impressionists’ preoccupation with light–was immediately bust. I envisioned replicating this dancer above using mostly white with hints of blue and warmer colors for her skin. Well, mid-drawing, I scrapped that plan and decided the focus of the project would be the bright colors (Because there was no shortage of bright colors in this box! The only muted one was the brown.)
Step 3: Let the fun begin! I will instruct my studnets to lightly draw the basic shapes of thier dancer or fish. Using yellow chalk (light, because darker colors will cover it later, if need be), I drew the basic shapes of the main dancer that is part of the paiting at the top of this blog: mostly circles and elongated ovals for this. (I’m sorry, when I did this project, I wasn’t planning on uploading the steps, and therefore did not take pictures of each step.)
This is such a great dancer to mimic, of all his dancers, because the pose is really uncomplicated. And when you’re using chalk on a wet surface, you will be glad we don’t need to make more nuanced, detailed outlines of the legs! Chalk, as a medium on a wet surface, will make you an Impressionist! If you have perfectionist/detailed propensities, this project will deny you that pursuit! The chalk is a bit hard to control in a first-time use, and there is no erasing. So just go with it; enjoy how the color smears on so effortlessly. Remind yourself, the Impressionists’ goal was to make the impression of the thing–not record its every detail–and capture the way light reflected off it. The goals are really quite achievable in this project.

After taking my results to my tutor meeting, my director said she could get white chalk if I wanted to go with my orignal plan requiring a lot of white. I said I’d take my project home, re-wet the fabric, and see if I could add white on top and achieve my desired result. In the picture above, you can see the left half of her dress is darker, and that is because I started re-wetting the fabric with oat milk again. Below, the entire dancer is covered with the milk.
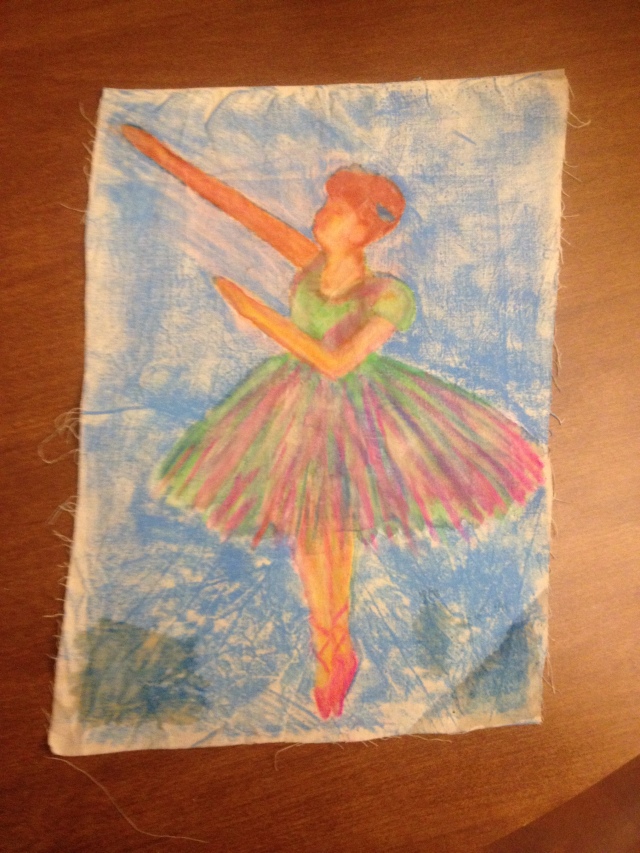
I wish I had a picture of what it looked like coated with white chalk for highlights (most of her the skirt, much of her skin). I laid it on THICKLY. At the top of this post, you see Degas’ dancer is mostly white.
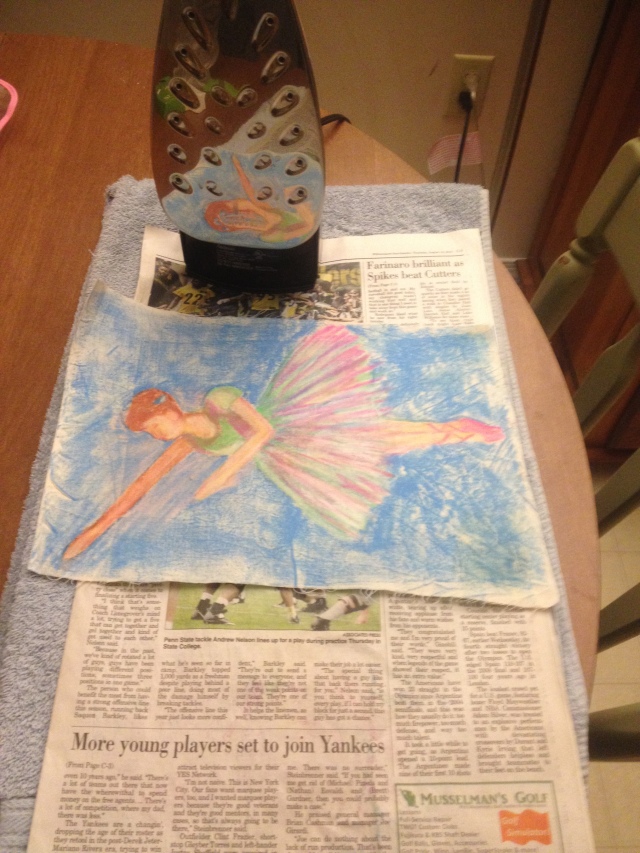
Step 4: When the student is done drawing (no matter if the fabric is wet or dry), take it the iron, on the wool setting. Make sure you have newspaper or scrap paper under and overtop the fabric. Ironing dries the milk as well as sets the color–somewhat. (The book advises not washing this as it won’t be colorfast.) Ironing takes away the chalky residue and leaves a smooth surface that does not transfer color to your fingers.
Others have asked me, “Won’t the newspaper ink transfer?” Before I even did this, I could say, “No” As a fabric batiker for years, using newspaper to iron wax out of dyed fabric, I can speak to this with complete confidence: iron away.
Very important note: the white chalk dissolves in the milk! My dancer, prior to this ironing, looked like her costume has been caught in a blizzard of white snow–at first! The heat makes the powder dissolve even more. So this is a very important lesson: you need to use chalk with pigment if you want it to stay! White can be used to keep an area white but it will not be effective at covering a pigment underneath.
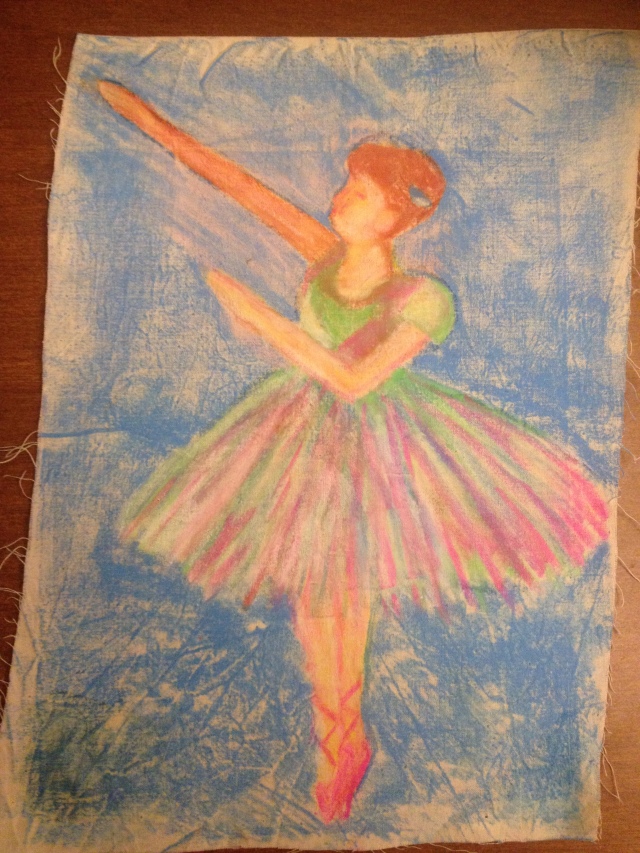
Finished product: My final result, after re-applying white 3 times (!): there is some muting of the pastels in her skirt and on the left of her bodice. But word to the wise–white can hardly be counted on to lighten up darker colors already used; the class done’st have the time to re-apply and re-apply as I did. So, knowing this, I’m back to planning my students’project goal to really be about bright colors.


As you can see above, there’s not much distinction between my two versions; applying many layers of white chalk on top for the second one did not make much of a difference.
Hopefully, my discoveries and mistakes will equip you to know what to avoid, but most of all, know that despite all, this has been my favorite project so far for the year. I think kids will love it! I think it’s the easiest one so far, and really doable in our time frame.
And if you do this, please share further experiences and tips below!
Other articles:
Making Your Homeschool Schedule (and the revelation of a circle graph)
The “Perfect” Schedule–and When It Falls Apart
Recognizing the Good Days (and My Son’s Fascination with Medieval Korean Pottery)

Hi!
Thank you!
Could you email me the pic of the ballerina please?
classicalconversationsspotsy@gmail
Sure!
Rene, can you please email the ballerina pic to me also? I really like your idea! Thanks for posting!
I did–I hope you got it!
Do you have to use Milk to wet it… could water be used?
Good question! I’ve never tried it. I suspect it wouldn’t work as well, but it’s just a hunch.
I’m tutoring for the first time this year and I have a Masters class. I’ve really been enjoying your blog – it has been so helpful! Thank you! I am wondering if you can email me a picture of Degas’ ballerina that you replicated here? I’ve searched online but can’t find it anywhere.
I’m glad the blog has been helpful! I see the photo of the piece on my blog, but I no longer know where I might have a photo if at all. Have you right clicked on the image embedded in the blog and copied the image to print it?